.JPG)
This is the latest
Art in a Carton I received from Jan. The carton itself was beautifully decorated and I can't begin to describe the treasures it contained inside. Jan was most generous in her gifts and each one was made exquisitely. There was a fabric summer sandal bookmark containing a paper parasol at the back in a specially made pouch. It was made in hot summery colours and is such an original gift. I've never seen anything like this before and consider myself very fortunate to have received it. Then there were some hand moulded papers in various designs, a beautiful little handmade book with folded pages that pop up when you untie the ribbon and open it, a gorgeous charm with a vintage image and a fabric beaded square with a vintage image printed on to it.

All the gifts were handmade by Jan and you could feel the love and care she'd put into creating each piece - Thank you Jan! :-) This project has been such fun to participate in and I've received some wonderful pieces of Art created by some very talented people.
MARBLED PAPER USING THE SHAVING FOAM TECHNIQUE.JPG)
I visited my local craft store over the weekend and they were demonstrating this new method of marbling paper
(well by new method, I mean relatively new method - not everyone's heard of it). Anyway, I watched the demo and then had a go and do you know what? I didn't have to even buy anything to get started at home - well, no, actually I did and that was just the shaving foam - but hey sometimes you might have that in your home already.
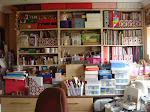
So, I got home and got out the necessary materials
(shown above). All you need are:
- some scraps of card or paper (works best on card or watercolour paper)
- selection of inks, paints, shimmer sprays
- kitchen roll and baby wipes on hand for cleaning up
- a container (size depends on what size paper you're going to marbleize) I used those plastic containers they give you when you get a takeaway.
- can of shaving foam - (cheapest will do)
- sticks for mixing and marbling
You'll need to protect your work area with clean paper and then keep your pieces of card or paper ready to marble.
.JPG)
all the materials you need to create wonderful marbled pieces
Give the can of shaving foam a good shake before squirting generously into your container, filling it approximately a third full.

shaving foam coloured with inks, paints and glimmer sprays
With your stick comb it through the foam to settle it a bit and now here comes the fun bit - add the colour drop at a time on top of the foam. It's best to keep it to a max of 3 colours at any one time or you'll end up with a murky mess.
Comb your stick through the foam distributing the colour into a pleasing pattern (this is where you use your own discretion and eye)
Take your piece of card or paper and lay on top of the coloured foam and push and rub the card or paper slightly to pick up the colour - lift carefully with your fingers or tweezers.
At this point the card will look a mess all covered in foam and murky colours, but don't worry! It's only when you scrape off the excess foam onto the side of your container and then with a dry wipe or cloth, wipe the rest of the card.
What you see before you will be a gorgeously marbled card with streaks of ink, paints or shimmer (depending on what you've used). Leave this card aside to dry and move onto your next piece.
You don't have to keep adding colour each time you marble your card - just use your stick to create different patterns in the foam and lay your card in. You can add fresh colours to the same foam and spray in glimmer sprays and create swirly patterns in the foam and then lay your card on top and press and lift to see what wonderful marble designs you can create. Believe me no two designs will ever be the same!
Now for the science.... The foam acts like a carrier for the paints or inks - so, basically the foam wipes off and the colour remains on the card - clever huh?
You can further enhance these marbled cards by spritzing over with glimmer sprays or just keeping them as they are and use them as ATC backgrounds, for greeting cards or any host of crafting projects.
This is a really fun technique to do with kids as they'll enjoy them tremendously trying to out do each other to see who can create the best marbled designs. It's very enjoyable and is suitable for even the youngest of kids. Just make sure you have plenty of wipes on hand as it can get very messy :-)


.JPG)
.JPG)
.JPG)
.JPG)
.JPG)

.JPG)

.JPG)
