altered Smokey - he was sitting on the grass. I sanded all the background and painted it, then outlined his body with an awl and scratched into his fur and painted into it.
I bought a book recently Complete Guide to Altered Imagery by Karen Michael. It's a great book filled with so many techniques for altering photographs, magazine images, for creating transfer images and how to alter digital images. It's packed with techniques and steps to show you how to create some amazing art from your own photos. So I decided to have a little play around with some of my lesser pics - blurred images, over developed shots, generally naff photos that I wouldn't put in an album really. I just followed the tutorials in the book and I was amazed at the results. See for yourself!
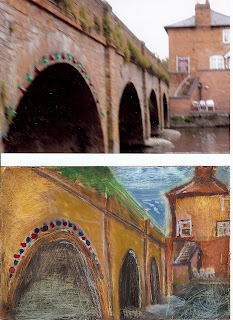
This is a photograph of a bridge over the River Avon I took when
The technique for altering photos are quite simple really and most of the materials you need are basic household stuff you probably have already:
domestic bleach poured into a shallow tray container and a tray container of cold water
protective gloves
an awl or sharp instrument for scratching into the surface of the photo
fine sandpaper
white gesso
flat brush
water soluble crayons/water colour paints
permanent black marker pen
paper towels
and most important of all some photos you want to alter.
I just normally pick out the naff, out of focus, obscured, head cut off, feet cut off, over exposed photos - but there's nothing to stop you using good photos just to highlight and alter to make more interesting - these are especially good to use in your art journals:-) By the way, we're talking of proper photographs on proper photo paper, not magazine images or postcards:-)
- dunk your photo (one at a time) into the bleach solution for about 30secs - 1 min ( I noticed
that matt images take about a minute to soften whilst the glossy photos soften in about 30secs). - Remove the photo from the bleach solution and put into the water solution to rinse quickly.
- Sand your photo lightly to remove the shiny top surface and then apply a light coat of gesso, making sure you can still see the image beneath.
- When the gesso is dry scratch around the outlines of any shapes you can see to highlight
- lightly sand the background to create more texture
- Using the water soluble crayons or watercolour paints - paint in areas of your photo to alter it and when dry you can further add more scratchings and sandings to paint over to create depth and layers - stop when you're happy and leave to dry:-)
These are just the basics for altering a photograph. There's so much more you can do to enhance, alter and digitally recreate your photographs and images - but you'll have to buy the book to learn more won't you? :-)
Altered image of ME!


2 comments:
wonderful pictures! you've sold me; I look at that book every time I go to the bookstore, but now I have to buy it! (and goodness knows, I have plenty of not-great photos to practice on!!)
Hi Jennifer!
Thank you so much for visiting me and leaving such great comments:-) I'm glad you like the pics and if it makes you wanna buy the book and try this technique then that's great! I'd love to see your altered photos when you've done them:-)
Post a Comment